
Installing a new doorknob may look complicated, but with the right tools and a clear process, it’s one of the easiest DIY upgrades you can do at home. Whether your old knob is loose, broken, or simply outdated, this guide walks you through every step so you can replace it confidently. And if the door itself needs repair or you want expert door installation in San Antonio, we are always ready to help.
Tools and Materials You Will Need
Before starting, gather these essentials:
- Screwdriver (Phillips or flat-head)
- Hammer
- Wooden block
- New door knob set
- Screws (included with knob set)
- Measuring tape
- Wood putty or filler
- Strike plate (usually included with the latch)
Having all tools ready ensures a smooth installation from start to finish.
Part 1: Installing the Latch
1. Remove the Old Door Knob and Hardware
Remove the existing knob, latch, and strike plate. Use a screwdriver to remove the screws on the faceplate and the strike plate on the door frame. Lift the hardware out gently to avoid damaging the wood.
Most new latch kits come with a matching strike plate, so replacing both ensures a clean fit and reliable closure.
2. Fit the Latch Plate
Latch plates are either round or rectangular. Choose the one that matches your door’s mortise (the cutout where the latch sits). If the new plate doesn’t match, measure the existing one and buy a compatible version.
Place the latch plate over the latch and make sure it sits flush. This protects the door edge and helps the latch slide smoothly.
3. Insert the Latch Into the Door
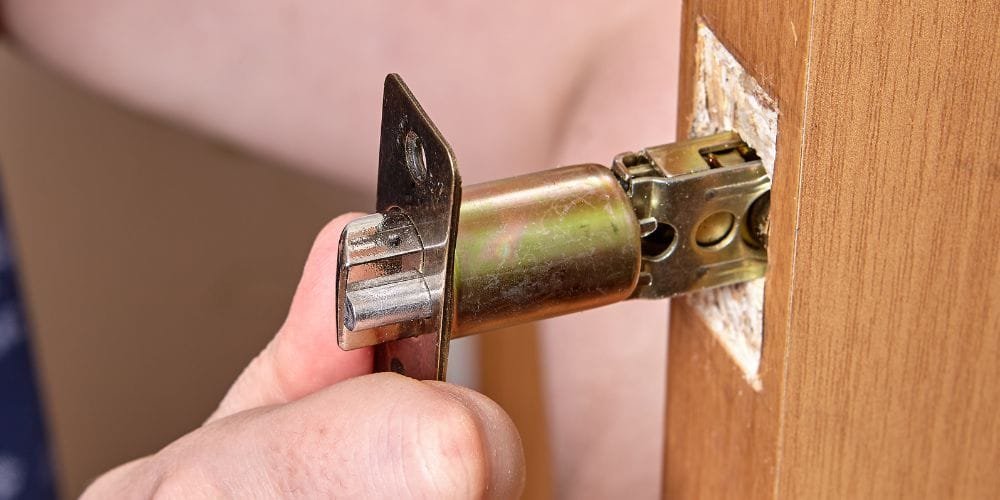
Slide the latch into the hole on the door’s edge. The beveled side must face the door jamb—otherwise, the latch won’t catch properly.
4. Tap the Latch Into Position
Place a wooden block on the end of the latch and tap it gently with a hammer. This protects the latch from dents. Continue tapping until the latch sits fully flush with the door.
5. Secure the Latch With Screws
Use the screws included in the kit to secure the latch plate. Avoid using random screws from home—mismatched screws may loosen over time.
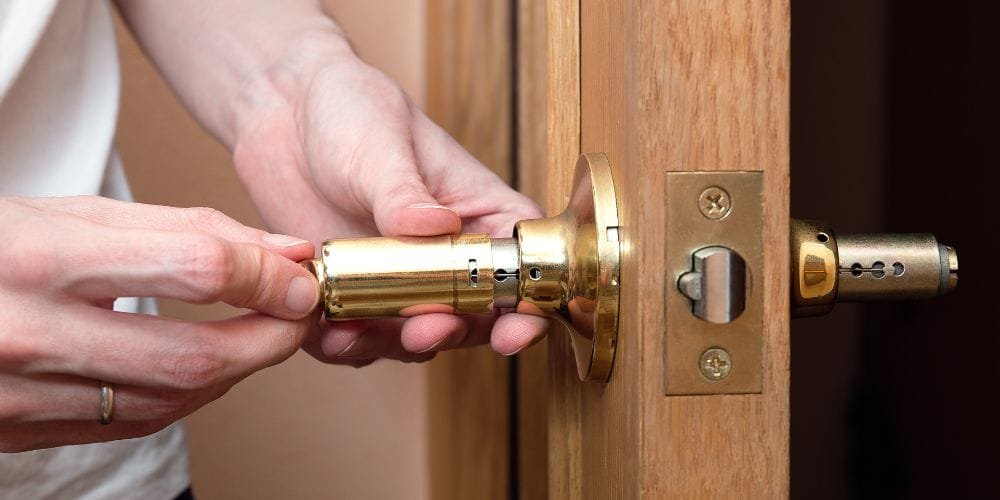
Part 2: Attaching the Door Knob
1. Install the Interior Half of the Door Knob
Start with the knob that has the square steel spindle. Insert it through the latch mechanism. The spindle should rotate freely and lock into place.
2. Align the Exterior Knob
Place the second knob on the opposite side of the door, ensuring the screw holes line up correctly.
3. Join Both Sides Together
Press both halves together until you feel them connect. If the fit isn’t smooth, pull them apart, realign, and try again.
4. Tighten the Screws
Insert the screws and tighten them until the knob feels firm and secure. Do not overtighten, as this can cause the knob to bind.
Your new doorknob should now function smoothly.
Part 3: Finishing Touches and Testing
1. Reinforce Loose Screw Holes
If previous holes are too large, fill them with wood putty. Allow it to dry fully—typically 30 minutes to a few hours—before reinstalling screws. This gives the knob long-term stability.
2. Install the Strike Plate
Position the new strike plate on the door frame and secure it with the provided screws. If the latch does not align perfectly, you may need a strike plate with a slightly different opening.
3. Test the Knob Thoroughly
Open and close the door several times. Make sure:
- The latch engages smoothly
- The knob turns freely
- The door closes without resistance
Tighten any loose screws as needed.
4. Touch Up the Door Surface
If the new hardware is smaller than the previous knob, you may see exposed, unpainted areas. Apply paint or stain to match your door. If the door looks worn overall, consider refinishing or repainting for a refreshed appearance.
Common Mistakes to Avoid
Homeowners often run into these problems:
- Installing the latch backward
- Using the wrong latch plate shape
- Overtightening the screws
- Not aligning the spindle correctly
- Ignoring loose or stripped screw holes
Avoiding these mistakes ensures your doorknob stays secure and functions properly.
When You Should Not DIY
Call a professional if:
- The door frame is damaged
- The door is misaligned or sagging
- The latch opening doesn’t match the strike plate
- The door requires trimming or rehanging
For full door installation, door repair, or window repair in San Antonio, the specialists at Mr. Fixer can take care of everything quickly and affordably.
You Can Also Read: What are Some Common Door Issues?
FAQs
1. How long does it take to install a doorknob?
Most installations take 10–20 minutes if the door is properly aligned.
2. Do I need special tools?
A basic screwdriver is enough for most installations.
3. Why won’t my latch catch the strike plate?
Usually due to door misalignment or an incorrectly positioned strike plate.
4. Can I replace the knob without replacing the latch?
It’s possible, but not recommended. New knobs are designed to work with their matching latch.
5. When should I call a handyman?
If the door is damaged, doesn’t close properly, or requires framing adjustments.
Need More Than a Doorknob Fix? Call Mr. Fixer Today
If you’re dealing with sticking doors, damaged hinges, latch issues, or want a full upgrade, Mr. Fixer offers expert carpentry services throughout San Antonio. From new hardware installation to complete door replacements, we make the entire process fast and stress-free.
Improve functionality, strengthen security, and boost curb appeal — all with one trusted team.
Transform your space today with Mr. Fixer. Get reliable, budget-friendly door and window solutions now.